I have learned that Interleaving Practice is an "official learning technique" from my favorite author - Barbara Oakley and I am glad she took the time and effort to educate the world about it. I would not be surprised, however, to hear from someone else, that they had been doing the same thing for a long time... The reasoning behind it makes absolute sense to me, and is very well described in the video from GoCognitive that you see in this post.
Since I teach a high school Geometry for both - regular (1-year) and a 2-year Common Core sequences, - I have to have a flexible scaffold-able unit for each of the big ideas. A unit, that would allow to teach at different learning rates a) prerequisite material, b) material that needs to be spiraled, and c) the new material. Sounds like a job for Interleaving practitioner!
I have been intentionally using this practice (or so I want to believe) in my instruction for a few years now. This holiday season I, finally, devoted some time to neatly organize my Area and Perimeter Unit.
...My next post will be an overview of the results...
I am considering a platform to organize my resources. I already have a word document with a simple log of related items, but it is not the most convenient for my students source to use, since sometimes titles ( I want to say "text") can be not as helpful for them as pictures for identifying the type of information they may be looking for. This is my first experiment with www.thinglink.com basic account, which allows 5 free links per image.
I have an image of a geometry mind map (bisectors) and my youtube videos with basic explanations attached to them. It is good to go for my 2-year-Geometry classes or for a Regents Geometry class Review.
If not this, than I can see 2 other possibilities. One is: just post all videos and docs on my classes pages, in the order I teach them , organized by chapters. The other thought is to have a full unit mind map from www.imindmap.com with videos and docs attached. This may be costly, but faster to generate maps, and there would be no limit for the attachments...
Can anyone advise me on this?
I am thinking, it should be something that allows to see students' progress, and yes: I want to use ...mind mapping for it! I use this particular Geometry Bisection vs. Partition Bulletin Board Set for a number of activities, allowing students to take an active role in putting it together into a mind map (as in a previous post) while we learn these new ideas (or, refresh them). Sometimes I may choose to put these “puzzle” pieces up all at once, but mounting one piece at a time, as I
teach a new idea, gives me an opportunity to visualize the process of creating a body of knowledge for students: one piece to another, somehow, possibly, connected to each other.
I prefer to spread assembling this bulletin board over a few days, because I like the idea of using it as an instructional tool with a reference value that supports procedural fluency and exhibits authentic student models.Sorting activity is another way to utilize this Bulletin Board Set: at the end of the unit students can be asked to generate their own summary of the material. Later, as a follow-up activity, the sorting of the bulletin board pieces can be done in class and compared with your students’ work. This is, actually, a good way to introduce (or strengthen) the idea of mind-mapping, which may serve your students well.
Below are the images of the bulletin board "parking lots” , which I use for a sorting activity with the Unit Review. The idea is that after students complete their Unit Review practice, I ask them to sort their task cards (one per student) by placing each of them onto the corresponding cloud of the mind map (each type of the situation in the map is color-coded).
My students assemble the map itself before this sorting activity, as part of verifying their individual maps, completed for homework earlier. **This Bulletin Board on Basic Geometry Concepts is now ready to be both: our Word Wall and Active Reference**
"parking lot" clouds for task cards
that illustrate variety of situations
where a given rule is applied.
Sunday
Who knew that I like Disney Pins :)!
This is one of my favorites.
Kids ask me "Why?!?"
My answer: "Because Nerds will Inherit the Earth!" :)
That seems to be enough.
I found this interesting fact in New York Hall of Science an use it since, to demonstrate the idea on Center of Mass. It is not a difficult concept, but this tidbit of information is an awesome application that drives to the point the practicality of it while making teaching CENTROID more fun. I'd love to have more of these jewels for my classes, so please, share, if you have some more....
Many Geometry teachers know, that students do not buy into these two Mathematical Practices right away: they are more likely to skip to conclusions (often-incorrect ones) and write down their answers (if they, actually, get to any). It takes a big effort and perseverance on both sides (tchrs' and ss') to finally get clear justifications in students' work, which are the demonstration of "Making Sense of Problems and Persevere in Solving Them".
I do not know how much of this struggle is about overcoming students' disbelief in the need for this extra effort and how much comes from the fact that they feel overwhelmed and confused with the steps, since they do not, yet, have clear "cause-and-effect" connections within a new topic. This might be individual, but I did notice, that when they work with flow-charts, mind maps or at least solved-examples, there is less of that resentment and more of communication between my learners. Over time I came to the conclusion, that we (ss and I) were getting better results, if we approached learning in strides. I am attaching a GIF that shows the break-down of how I teach basic Geometry terms, relationships and diagramming. Feel free to download it. It the previous post you can find a video with the same GIF, in case it is easier for you to use.
First, we want to have strong connections between just a few Geo vocabulary terms, such as Segment Bisector-Midpoint-Congruent Segments (see my earlier post about it HERE).
Then, we want to show consistent applications of those terms to various problems. That is where we practice structure and make connections with similar situations or draw conclusions that there are no connections, and justify why. We work with this sort of practice using only one idea at a time (ex. Segment Bisectors; Angle Bisectors; Special Angle Pairs).
I included the summary mind map, which lures students into such exercise and may be used either on four different occasions, or during a summary lesson.
Third stage usually involves interleaving practice (more on this HERE), which calls for students' focus on "comparing and contrasting" between all terms withing a unit and related situations. This is when I would normally give a follow-up writing assignment, asking students to zero-in on certain aspects of the topic. This is a sample of such assignment.
We, teachers, experience it almost every week: our kids may "get" the material on a day-to-day basis,when it is taught one idea at a time, but once they are at the point when they have to deal with a mixed bag of questions, some of students have trouble even starting. I believe that it is very important to let our students know of this very well-recognized psychological phenomenon and that it should be expected. Every learner has experienced it at some point: as beginners, we might know chunks of information, but most likely, we have not, YET, see connections between them or even developed retrieval mechanisms for initiating them. Sometimes getting over this hump takes us longer then other times...but being aware of it, definitely helps students avoid much of the frustration related to the process. It is very easy for us, teachers (aka masters of the topic at hand) to take for granted our ability to see the whole picture, and underestimate the value (and magnitude) of students' struggle here. Meanwhile, this experience can be transformed into one of those GRAND teachable moments, that, perhaps, explain why we want our children to learn Mathematics...It shows, that mastery starts with learning facts, comparing and contrasting, deciphering through relevant traits, trying them out, and, maybe, identifying illusions of competence, and tuning up the process along the way. Mastery comes with perseverance ...just like in real life... INTERLEAVING -doing a mixture of different kinds of problems-is what I use to help students to move from a novice to an experienced learner of the topic. Below is a short video of the mind map that my students will have by the end of the Units on Basics of Segment and Angle Relationships. We summarize new material into CHUNKS reflected by this map (same order as in the clip) after learning new terminology, use of symbols and appropriate diagramming. At the end of the unit, we use this map to help with learning how to shift our mental gears from one situation to another. The poster of this map became a very handy reference when we needed to bring back the structure of communicating about geometric relationships throughout the school year. Usually, these two topics are taught in the beginning of a course, which makes them vital for an easy student transition to the new level of expectations to their work. I find, that students whose attendance was spotty during this time, have a much harder way of finding a good standing with the subject. I can not control their attendance, but at least I can make an attempt to help them catch up. Later on, I will be posting the videos that give a thorough overview of the material in the CHUNKS of this map.
I bet that regardless of how seasoned one is as a teacher, there is always a question in one's mind about the best way to spend that first week of school...
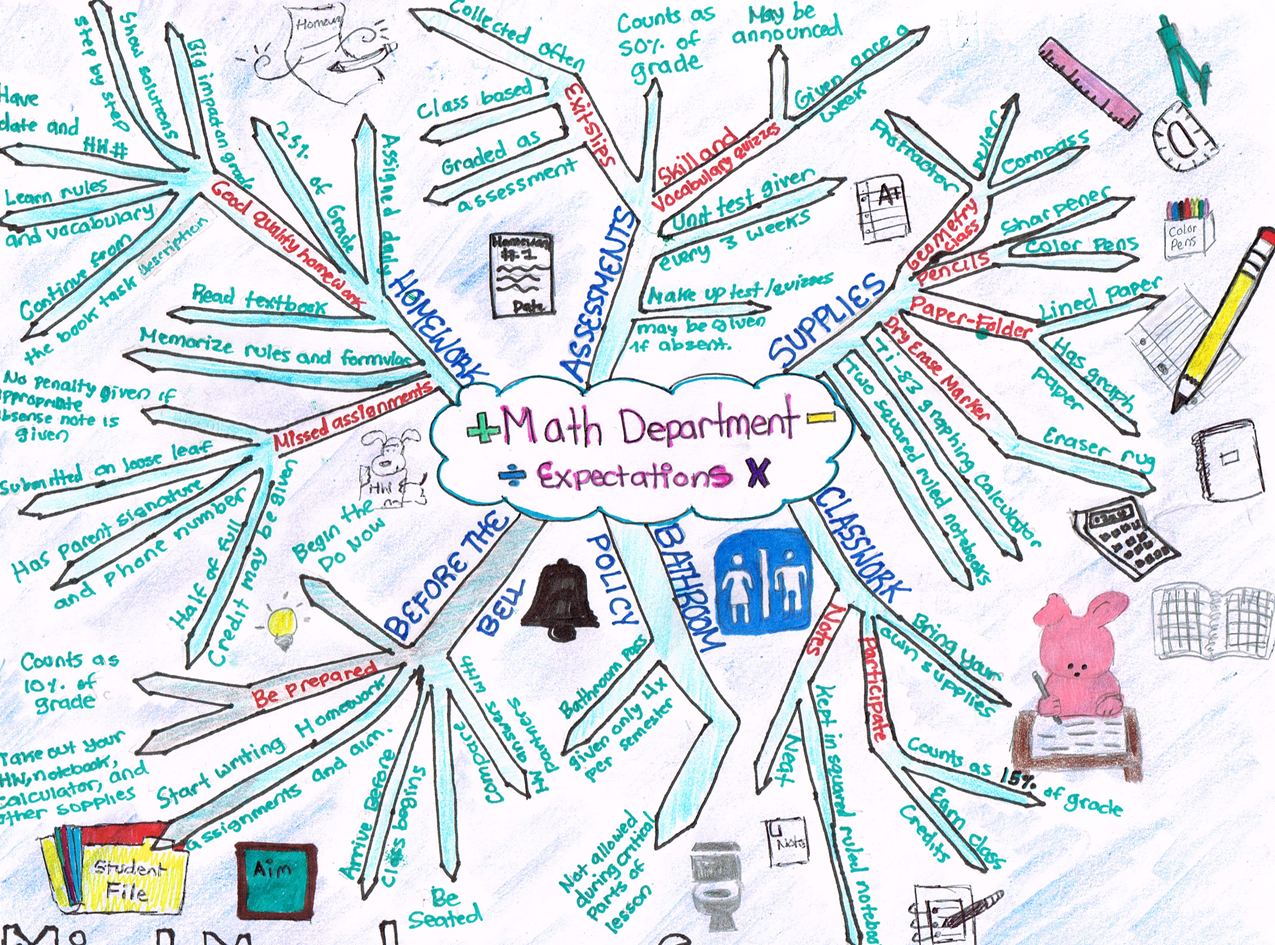
It is the time to establish procedures, lay out expectations and open lines of communication. I also find it to be the best time to start building the Thinking Culture. Throughout the year my students and I consistently work on making connections between the topics we learned or were familiar with before a course started. I often model the creation and use of mind maps, and it had always been on my mind how to help students come up with their own ones, rich with knowledge at their current curriculum level. I had some success with it over the years, but I always felt that there could have been a better way to explain how I want my students to work on it. I realized that it makes more sense to have this conversation far removed from Geometry topics, but with something engaging, something that kids could be curious about, yet not overwhelmed by it. I chose the topic of Saving Energy. Last year I finally structured it into a formal How To Mind Map Lesson Plan for the first week of school. This kind of helped me commit to the idea of weaving Mind Mapping throughout the curriculum. This meant that my expectations for the amount of work we would be able to get out of "thinking this way" during the school year was doubled, and doubled it was! I followed up with a little home project on making a mind map on class expectations, and was pleasantly surprised with the outcomes: so many students demonstrated artistic skills and creativity well above and beyond my own... and one more surprising effect: seeing the results actually changed my first impressions of the students or, rather helped me see their facets that I had not seen yet... I included some samples for your appreciation.
This summer, the "silly" in me, and the spirit of experimentation, helped me make the video (see below), in the hopes that it will be easier for my students to refresh our class conversation, when it starts to fade away. Feel free to check it out here or on my youtube channel. It is one of my first ones...but it already gave me a taste of skills for the 21st century...but it could be a different post...
So...for this September I animated my lesson and Included the Project description in SmartNotebook, to make the presentation more streamlined, with visuals, to get my point across faster, plus, if my colleges ever wanted it, it would be available for them.
I have mentioned earlier that in my Geometry classes we work on forming "basic chunks of knowledge" (yes, I am deeply affected by Barbara Oakley's teaching) and build fluency with them before they actually plunge into writing proofs. Last year I increased the intensity of the Proofs Unit, including more sophisticated problems, on top of that, Common Core pressure contributed to time shortage, so I needed a reliable way to ensure that all (?!) of my students could follow through with proofs independently, therefor I decided to use some hands-on practice, that allows kids to quickly "sketch" their thoughts before those slipped away: without worrying about the proper order, notation or writing fast enough... This would allow the final "combing" through the chunks of learning, "catching" last kinks my students may have had in their cause-and-effect connections within the vocabulary-symbols-diagrams bits of Geometry. For that, I had them work with MINI-ProofBits in small groups (of 2 and 3) without me facilitating at the board... To eliminate as much Cut&Paste as possible, I laminated a few sets of bits, color-coding the sets for an easy collection/storage. If you ever go for it, use a 5mil Matte laminate pouches to avoid reflection and make them less slippery. I was generally pleased with the outcome: the bits were big enough for students to handle, yet, small enough for a set to fit on a desk; it was easy for me to scan their work for further intervention....
Tactile experience with proofs may help some students understand how they work.
A few surprises:students actually eagerly asked each other for an opinion on what should be next, having those accountable talks we always want to hear.It was especially nice to see when groups came up with alternative proves... As the kids were discussing who was correct, and why, and what was the difference in the other group's approach, it almost felt like they were moving around the "lego-blocks of their thoughts" in the form of the Bits. It is almost as if they could touch their houghts, see them and not just talk about them... it made a difference for the weaker students: a tangible model of the process helped them make sense of the proof process. Of cause those were the simplest proofs, but the idea of how they work was loud and clear. Some issues to work out:So....this year I might have some 2-year remedial Geometry courses, and I feel I need to provide this tactile experience. However, since this time my classes will be big (30-34 ss) it will be a challenge getting my laminated sets back in full or cutting them in class... so I decided to try something different: I will give every student a disposable set of ProofBits, that needs to be cut only once and will last until they are ready to sketch their proofs with pen&pencil. This is how it works, so far: 1) Organize ProofBits vocabulary in groups: those pertaining to segments are on one sheet; the ones about angles are on the other, and the basic axioms/theorems involved are on the 3rd sheet; 2) Use 3 different colors of paper to distinguish between those 3 groups; Staple them on the left. 3) Every proof-bit is repeated on the page at least 5 times (in line). I numbered each line for reference and organized the terms in the order that would help kids with weak memorization skills (did I just say a forbidden word?!) get a grip on what links to what. 4) Cut between those lines, but leave the strips connected at the stapled side (it will look like vermicelli ); cut it to the size of a notebook (this could be done for HW ) 5) Tape that pack of vermicelli in the back (or the front) of a notebook. It is now ready for work: no need to mess with scissors-just crease one Bit at a time and tear it off. Voila! Cut it Once, Paste it while it Lasts! I will update you later in the year on how this goes, but feel free to join testing this beta version out with me.
We begin preparation for Geometry Proofs long before the unit officially starts: in our Algebra class. Justifying steps while solving equations with an appropriate property, helps build the idea of "every step has a legitimate reason to be done, and is done with purpose".
In the first weeks of Geometry class we zero in on definitions and the use of their structure ("if..., then..."). This helps identifying "the cause and effect" for following actions, and, essentially, for statements and reasons we will be using in proofs. Every lesson, for weeks before the Proofs Unit, I pepper my students with short jeopardy-style questions: " "Segment bisector" implies.....", ""Midpoint" implies...". Every day we use ProofBits, like the ones on the photo below to help students see regularity and structure used in the process. The same questions
are also given in the form of symbols or/and diagrams. This allows students to appreciate the structure of definitions, their importance and meaningfulness of symbols and diagrams in geometry. These little daily recall exercises ease student's transition to formal proofs. I personally find the process of writing them beautiful and mentally satisfying, and I hope my kids see the beauty and satisfaction in it, once the stress of trying to remember steps is gone.
This photo "gives it all out": I've been using my "proof-bits" for quite a while, and my magnets started to loose color and shape. It was definitely the time for an update! Thank goodness for a long summer vacation: I learned how to use my gadgets, and made a new set.
It is now bigger and more unified, which means it will be easier for students to see/recognize and work with the bits. It is also a full collection of vocab, postulates and theorem one would need in class. To make it more functional, I laminated them (matte finish) and glued them o to a magnet sheet. This is very easily done, since the template is made to fit the 8.5"x5.5" sticky address labels. The size of each Bit is about 8"x2", so they are very easy to see from any point in the classroom.
Some time ago, as I was working on the Linear Inequality Unit for my Algebra students, I realized, that after the first day of teaching it, doing the review on Day 2 would very much sound like teaching it again or , if I did it in a hurry, it would sound like a meaningless chant. Either one of them would not only put my students to sleep, but make me bored with it, so this Hidden Rule Identity Activity occurred to me. Given that I knew which rules kids needed to become fluent with,and which errors were likely to happen as they worked on their mastery...why not design a question with 2 versions of an answer, that only differ by one feature. This feature only ( ex. - boundary line solid vs. broken; - shading above vs. below; - reading y-intercept and slope from a wrong form of the equation; …. and so on...) needs to be identified in order to pick and justify the only correct answer. It turned out to be one of those activities that year after year brought a smile to my face: kids got to flex their mind ( talking about information retrieval from passive memory!) and really worked together (likely, one of them remembered something, the other - something else). It worked just as well for the Algebra 2 classes, to bring us back up to speed with the topic.
I always had a hand-written version of it, but now I finally made myself organize it in a proper way and share it with the world.
It is that time of the year again...the first day of school is almost here!
It promises to be interesting, just look at this page-the evidence of me e-volving into an online collaborator! I have learned so much over the summer about the possibilities of online learning, that it was unacceptable to ignore them any longer...gotta start moving in this direction. After all, how would I teach my kids the 21st-century skills?!!
As usually, I started the preparations to the new school year with going over my “First Day of School” materials: tweaking them, choosing the most appropriate… here are few of those that I would like to share. They served me well, keeping me organized, with the information “at the tips of my fingernails” even before I could reach for a keyboard.


